
Check out PlanSwift 10.1 in action with this quick tutorial video!
PlanSwift is proud to announce that version 10.1 of the number one takeoff and estimating software has officially been released! It’s got new features and new ways to help you quickly and accurately complete your jobs.
New Features:
The key feature for 10.1 is a Report Designer included with the core program. Report Designer started off as a plugin and was later integrated into the software itself as a new feature.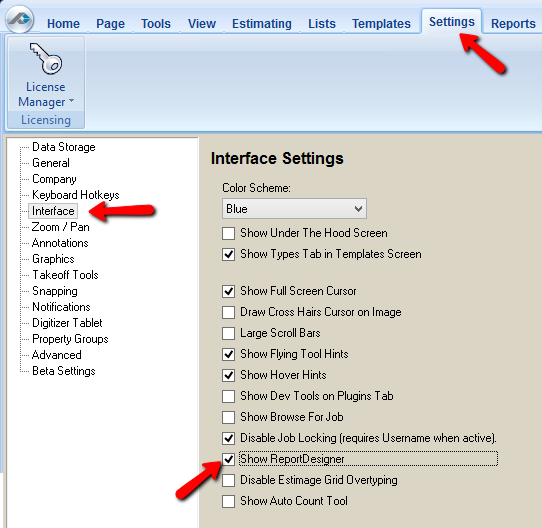
Report Designer is a button on the “Reports” tab that launches the Swift Reports Plugin. Swift Reports is typically for more advanced users. It gives you the ability to design custom reports inside of PlanSwift and also allows the software to integrate with Fast Report 4.
Report Designer isn’t available unless the user enables it in the “Settings” tab. To enable the button in the software go to the “Settings” tab, then click on “Interface” in the left hand column and check the box next to “Show Report Designer”. Then if you go back to the “Reports” tab you’ll be able to find the Report Designer button.
Updates:
The Beam Tool has been updated to default the number of Plies to “1”. This should reduce confusion for the Show Labels, Create List, and Show Plies Options.
The Beam Tool is designed to speed up the process calculating the beams and headers needed for a job. To use the Beam Tool first click on the “Beam Tool” button under the “Scripts” tab and a window will pop up opening the Beam Tool dialog. In the “Name” field enter a name for the beam or group of beams you’re going to create. Most estimators typically name the beam its size or type of beam. If you’re selecting an already created group just select it from the drop down menu.
You can also pick a specific color for your beam group to be by selecting one in the drop down menu in the “Color” field. By default the bearing is 6 inches. The bearing is how far the beam is going to overlap the endpoints you click for the span. Change value as needed.
The options are made to round to the nearest foot or two feet to help you calculate the correct product lengths you need to order. The “Tab” field allows you to select which tab in the estimating window the new group of beams will be put in. Then just click “Ok” to start drawing your beams.
The Single-Click Takeoff preview has been updated and is now better than ever. PlanSwift has also enhanced the CutLines for Single-Click Takeoff to make it that much easier for professionals.
In version 10.1 of PlanSwift there’s a new information box for PDF to TIFF files. “We recommend converting from PDF to TIFF format because TIFF files in PlanSwift tend to perform much better when Zooming, Planning and Navigating between pages. However, PlanSwift will work with PDF files and depending on the specifications of your computer you still may see reduction in performance. Many PDF’s will perform better if you flatten them first. This is effective for PDF’s with multiple layers.”
PDF to TIFF range is now defaulted to 50-300 DPI and has added a Hover Note to the box. This can be changed in “Settings” tab.
Check out all these new features with a FREE 14 Day Trial of the Newest version of PlanSwift click here:
Is this program Mac compatible?
Yes / No. It is not natively compatible, it is a windows program. For PlanSwift to work you would have to use Parallels, VirtualBox, VMWare, etc. to run windows inside of your Mac.
Ok. When I closed out of all applications. I tried to reopen plan swift and it just pulls up the windows 10 desktop screen. But it will not allow me to click on any of my icons and it does not even have the planswift icon on the windows desktop. What could possibly be the problem?
That is an odd one, please give our support team a call at 888.752.6794 option 2 or a quick chat (https://www.planswift.com/support/).